|
条件として「(1) 事前に SQL Server から全ての情報を DataTable に読み取ってか
らそれを操作」ということに注意してください。
また、質問者さんのレス No92025 ように Visual Studio のデータソース構成ウィ
ザードで自動生成された型付 DataSet / DataTable + TableAdapter を使うことで
考えます。
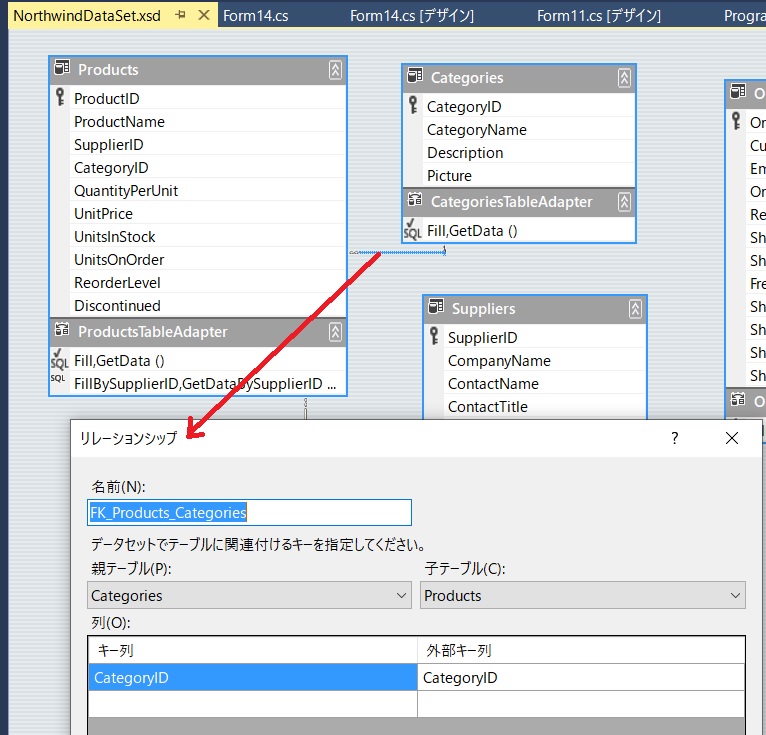
そこで質問者さんが使っている DB は当然ながら使えませんので、Microsoft のサ
ンプルデータベース Northwind を使って、その Categories、Products テーブルか
ら型付 DataSet/DataTable + TableAdapter を作ります。以下のリンク先の画像を
見てください。
http://surferonwww.info/BlogEngine/image.axd?picture=2019%2f9%2fNorthwind.jpg
元になる Products, Categories テーブルの CategoryID 列には FK 制約が設定してあ
るので、上の画像の通り FK_Products_Categories という名前のリレーションシップが
自動生成されています。
(FK 制約が設定してなければリレーションシップは自動生成されませんが、デザイナ
を使うなりコードを書くなりして手動で設定できます)
それを以下のように設定すれば ComboBox1 で選択された Category の Products が
ComboBox2 に表示されます。
using System;
using System.Data;
using System.Windows.Forms;
using System.Data.SqlClient;
namespace WindowsFormsApplication1
{
public partial class Form14 : Form
{
private BindingSource bindingSource1;
private BindingSource bindingSource2;
public Form14()
{
InitializeComponent();
this.bindingSource1 = new BindingSource();
this.bindingSource2 = new BindingSource();
this.comboBox1.DataSource = this.bindingSource1;
this.comboBox2.DataSource = this.bindingSource2;
}
private void Form14_Load(object sender, EventArgs e)
{
// Visual Studio のデータソース構成ウィザードで自動生成
// した型付 DataSet + TableAdapter を利用
NorthwindDataSet northwindDataSet = new NorthwindDataSet();
NorthwindDataSetTableAdapters.ProductsTableAdapter productsTableAdapter =
new NorthwindDataSetTableAdapters.ProductsTableAdapter();
NorthwindDataSetTableAdapters.CategoriesTableAdapter categoryTableAdapter =
new NorthwindDataSetTableAdapters.CategoriesTableAdapter();
productsTableAdapter.Fill(northwindDataSet.Products);
categoryTableAdapter.Fill(northwindDataSet.Categories);
this.bindingSource1.DataSource = northwindDataSet;
this.bindingSource1.DataMember = "Categories";
this.comboBox1.DisplayMember = "CategoryName";
this.comboBox1.ValueMember = "CategoryID";
this.bindingSource2.DataSource = this.bindingSource1;
this.bindingSource2.DataMember = "FK_Products_Categories";
this.comboBox2.DisplayMember = "ProductName";
this.comboBox2.ValueMember = "ProductID";
}
}
}
もちろん型付 DataSet / DataTable + TableAdapter を使わなくても、普通に DataSet /
DataTable と SqlDataAdapter を利用しても可能です。ただし、リレーションシップは自
力でコードを書いて設定する必要があります。
以下のような感じです。
using System;
using System.Data;
using System.Windows.Forms;
using System.Data.SqlClient;
namespace WindowsFormsApplication1
{
public partial class Form14 : Form
{
private BindingSource bindingSource3;
private BindingSource bindingSource4;
public Form14()
{
InitializeComponent();
this.bindingSource3 = new BindingSource();
this.bindingSource4 = new BindingSource();
this.comboBox3.DataSource = this.bindingSource3;
this.comboBox4.DataSource = this.bindingSource4;
}
private void Form14_Load(object sender, EventArgs e)
{
string connString = @"Data Source=(local)\sqlexpress;Initial Catalog=NORTHWIND;Integrated Security=True";
string queryCategories = "SELECT CategoryID, CategoryName FROM Categories";
string queryProducts = "SELECT ProductID, ProductName, CategoryID FROM Products";
DataSet dataSet = new DataSet();
using (SqlConnection connection = new SqlConnection(connString))
{
using (SqlCommand command = new SqlCommand(queryCategories, connection))
{
SqlDataAdapter adapter = new SqlDataAdapter(command);
adapter.Fill(dataSet, "Categories");
}
using (SqlCommand command = new SqlCommand(queryProducts, connection))
{
SqlDataAdapter adapter = new SqlDataAdapter(command);
adapter.Fill(dataSet, "Products");
}
}
// リレーションシップの設定
dataSet.Relations.Add("FK_Products_Categories",
dataSet.Tables["Categories"].Columns["CategoryID"],
dataSet.Tables["Products"].Columns["CategoryID"]);
this.bindingSource3.DataSource = dataSet;
this.bindingSource3.DataMember = "Categories";
this.comboBox3.DisplayMember = "CategoryName";
this.comboBox3.ValueMember = "CategoryID";
this.bindingSource4.DataSource = this.bindingSource3;
this.bindingSource4.DataMember = "FK_Products_Categories";
this.comboBox4.DisplayMember = "ProductName";
this.comboBox4.ValueMember = "ProductID";
}
}
}
|